How to Fix Temporary Profile in Windows 7
For windows 7, Windows 8, Windows Vista
That’s it, Now restart your computer..Issue must be solved, you can able to login your profile.
For windows 7, Windows 8, Windows Vista
Question
I recently noticed that some of my desktop icons & files are disappeared, even I tried to create a new folder and restart the computer, it is also not there after restart, there might be it was deleted automatically. I search about this issue in internet and got the causes that ” my user profile has got corrupted. Please help me to solve it.Solved Answer
Yes, your research goes to in a right way, this is the problem started because your user profiles has been corrupted, you have to repair it. Below we provides you a step-by-step guide to solve that issue, please follow the article instructions to solve this issue completely.Method 1
1. Rename the temporary profile from registry
- Start your computer and login with temp profile
- Click on START and then type RUN in search box and then click on RUN from found results, then you will get a RUN BOX.
- Type a command in run box “regedit” and hit enter or click on OK, then you will appear a registry edition
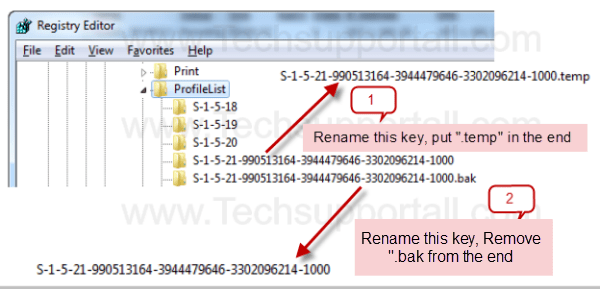
Please locate the following path in registry editor and rename two keys (as per shown below screenshot)
- HKLM\SOFTWARE\Microsoft\Windows NT\CurrentVersion\ProfileList
- You will get the similar keys under “profile list”, however one key may shows as end with “.bak”
- “.bak” is a your original profile Example: “SID-1213428093-345618312-2235-148770.bak”
- “Without .Bak” is a your current temp profile (which currently logged on with this profile) Example:“SID-1213428093-345618312-2235-148770″
- You have to Rename both entries
- Rename the key “Without .Bak“, rename it and put “.temp” in the end
SID-1213428093-345618312-2235-148770″
to
SID-1213428093-345618312-2235-148770.temp” - Rename the key with “.Bak“, rename it and remove “.bak” from the end
SID-1213428093-345618312-2235-148770.bak”
to
“SID-1213428093-345618312-2235-148770″
- That’s it, Now click on start and click on log off
- After log off, restart the computer once.
- After restart it will automatically get your old (original) profile
Method 2
- Open my computer
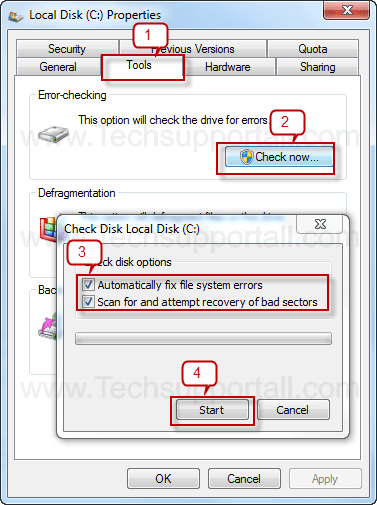
- Right click on C drive (where is installed the windows), and then click on properties
- Then a properties page will be appeared and please click on the tool tab
- Then you will get a button “check now”, Please click on that then a another popup will be appeared
- In this popup please tick all two boxes and click on start
- it will take time to finish and it might be create a scheduled to run this check disk in a next startup, then so please restart your computer (as per shown below screenshot)
That’s it, Now restart your computer..Issue must be solved, you can able to login your profile.