Monday, December 21, 2015

DPM agent install and Windows 2008 server Harding

When the server you try to install the DPM 2007 agent on is locked down by the Windows firewall, you could have a hard time installing the DPM agent on the server.


In most of the cases when you try to push the agent from the DPM administrative console you get an error message that the Windows Firewall on the target machine is blocking the installation.Disabling the firewall rules for all adapters can solve this issue. Run the following command on the Target machine before pushing the agent:
netsh firewall set opmode disable

When the Security configuration wizard is used, it can be a little trickier
My experience is that you get the following error during pushing the agent from the DPM console:
Install protection agent on xxx failed:
Error 313: The agent operation failed because an error occurred while running the installation program on xxx.
Error details: Fatal error during installation (0x80070643)
Recommended action: Review the log files on xxx: [windir]\temp\msdpm*.log and take appropriate action. Retry the operation, and if the error persists, restart the computer and then retry the operation again.


But also local install will falll with this error:Installing agent and configure for dpmserver =[xxx]
DPMAgentInstaller failed with errorcode =80070643, error says: Fatal error during installation.
Check log files in [WINDIR]Temp\MSDPM*.LOG
Press Enter key to close the window

Manual set DPM server wil also fail with error:
SetDpmServer failed with errorcode =80004005, error says: Unspecified error
The reason is that during the DPM agent installation some exceptions need to be made to the Windows firewall and with the Windows Security configuration Wizard.

The following workaround can be used:
  1. Logon to the target machine (from console – remote management card etc)
  2. Copy the installation files to a local temp directory
  3. Net stop mpssvc (will stop windows firewall services\will stop network connections)
  4. run the installation (for x64): DPMAgentInstaller_KB959605_AMD64.exe dpmservername.fqdn
  5. Reboot the target server
  6. Make a firewall rule that allows the application DPMRA to communicate(all profiles)
  7. On the DPM server, from the DPM Management Shell prompt, type Attach-ProductionServer.ps1 .

How to set the default attachment folder in Outlook

To Modify the Registry Setting

  1. Click Start, and click Run.
  2. In the Open box, type regedit, and then click OK.
  3. Locate the following registry key:
    HKEY_CURRENT_USER\Software\Microsoft\Windows\CurrentVersion\Explorer\User Shell Folders
  4. Double-click Personal in the right pane.
  5. Change the value to the path you want. For example:
    C:\My Attachments, would set the location to the My Attachments folder. 
    %USERPROFILE%\My Documents, would set it to the My Documents folder on a computer that had more than one user profile. 
  6. On the Registry menu, click Exit.
  7. Restart Outlook.
When you open a new mail message and attach a file, the Insert File dialog box opens to the folder you have specified.

Monday, October 19, 2015

Send Out of Office notices with POP3, IMAP, and Outlook.com accounts


NOTE    If you use a Microsoft Exchange Server account in Microsoft Outlook 2010, use the Automatic Replies feature. See Automatically reply to messages (formerly the Out of Office Assistant). This article is for all other email account types, such as Outlook.com (formerly Hotmail), POP3, and IMAP.
How can I tell if I am using a Microsoft Exchange Server account?
Click the File tab. Click Account Settings, and then click Account Settings. On the E-mail tab, the list of accounts indicates the type of each account. If Microsoft Exchange doesn’t appear, you are not using an Exchange Server account.

You can set up Outlook 2010 to send an automatic response to some or all of the people who send you email messages.
You can combine an Outlook email template with Outlook rules to reproduce the functionality of the Automatic Replies feature that is available only to Exchange Server accounts.
IMPORTANT    This functionality is available in Outlook 2010 beginning with Microsoft Office 2010 Service Pack 1.
Step 1: Create a message template
  1. On the Home tab, in the New group, click New E-mail.
  2. In the message body, type the message that you want to send as your automated reply.
  3. In the message window, click the File tab, and then click Save As.
  4. In the Save As dialog box, in the Save as type list, click Outlook Template (*.oft).
  5. In the File name box, type a name for your message template, and then click Save.
Top of Page
Step 2: Create a rule to automatically reply to new email messages
Do one of the following:

  1. On the Home tab, in the Move group, click Rules, and then click Manage Rules & Alerts.
  2. In the Rules and Alerts dialog box, click New Rule.
  3. Under Start from a blank rule, click Apply rules on messages I receive, and then click Next.
  4. Under Which condition(s) do you want to check?, select any criteria that you want, and then click Next. Typically, you don’t need to select any items.
  5. Under What do you want to do with the message?, select the reply using a specific template check box.
  6. Under Step 2: Edit the rule description (click an underlined value), click a specific template.
  7. In the Select a Reply Template dialog box, in the Look In box, click User Templates in File System.
  8. Select the template that you created in the previous section or one that you have created or downloaded, and then click Open.
  9. Click Next.
  10. Select the check boxes for any exceptions to the auto-reply rule. It is common not to add any exceptions.
  11. Click Next.
  12. Under Step 1: Specify a name for this rule, type a name for the auto-reply rule, and then click Finish.
Turn off automatic replies
To turn off a rule that is sending automatic replies, do the following:
  1. On the Home tab, in the Move group, click Rules, and then click Manage Rules & Alerts.
  2. On the E-mail Rules tab, under Rule, clear the check box for the rule that you want to turn off.

Sunday, August 16, 2015

Resize Azure VM OS or Data Disk

Resizing an Azure VM disk using Update-AzureDisk -ResizedSizeinGB

Resizing an Azure VM disk was only possible until recently by using third party software such as Cloud Xplorer using a multistep approach. Not ideal. Best practice says provision Azure disk at maximum capacity but for one of my customers I faced the challenge where I migrated VMs using Azure Site Recovery. ASR is a great tool but it provisioned the target VMs with disks that match the size of the source, and it doesn't provide the option to change this. Now what if I run out of space? Or what if I don't want a 30 GB OS volume, but the 127 GB default size.

To overcome this problem I searched and found the following article. Azure Linux VM - Resize root volume. Great article, but it's only covers OS disks and Linux. The article includes a new command which hasn't been documented on MSDN yet. Which is Update-AzureDisk -ResizedSizeinGB

In my case I'm dealing with Azure VMs that run the Windows OS, and in many cases it's not only the OS disk that needs to be resized, but also the data disk.

I tested both scenario's and can confirm the Update-AzureDisk -ResizedSizeinGB works on both OS and data disks. In this article I'll explain how to use the command to resize Azure VM disks.

Note: The disk cannot be in use, shutdown the VM prior to making this change. And it cannot be reversed. You can only increase the size, the command will not allow you to shrink. 

The command

The command is pretty straight forward and all you need is to be a co-administrator and running the latest AzurePowerShell cmdlet. The command itself is as follow. 

Update-AzureDisk -DiskName 'MyDiskName' -Label 'MyLabel' -ResizedSizeInGB 300

Changing the disk size Step-by-Step


The Azure VM OS disk resize

1. First of all we'll connect to the subject VM and check out it's OS disk size. In this case it's a standard Azure VM with a 127GB disk. It can of course also be a much smaller disk which is in desperate need of resizing.

Azure VM OS Disk - 127 GB


2. De-allocate the Azure VM. The disks cannot be in use at the time of the resize.

3. Connect to your subscription using the latest Azure PowerShell cmdlet. 

4. To resize the disk you'll require the Diskname. To retrieve this information, in my case of VM ate-azr400, run the following command. If you want to make your life easy, store this information in a variable.
Get-AzureVM -ServiceName ate-azr4 -Name Ate-azr400 | Get-AzureOSDisk


Retrieve Azure VM DiskName


5. Run the following command to resize the disk. This will take a few second so be patient while the resize takes place.
Update-AzureDisk -DiskName ate-azr400-ate-azr400-0-201502180257360595 -Label Resized -ResizedSizeInGB 300


Update-AzureDisk -ResizedSizeinGB


6. Now have a look in the portal and browse to the container where the OS disk is stored. You'll find that the VHD has increased from the former 127 GB to 300 GB.

New size in Portal


7. Power On the Azure VM, and open the disk management to view the changes that have been applied. If you require the space extend your volume.

Resized VM OS Disk - 300 GB


The Azure VM Data Disk Resize

To resize the Azure VM Data Disk you pretty much follow the same process. The only difference is the command used to retrieve the Azure Disk Name.

1. To resize Azure Data Disk you'll require the Diskname. Note that this time I run Get-AzureDataDisk. In this case I want to extend the 10 GB disks.
Get-AzureVM -ServiceName ate-azr4 -Name Ate-azr400 | Get-AzureDataDisk


Get-AzureDataDisk


2. Next I run the same Update-AzureDisk -ResizedsizeinGB cmdlet to resize the Azure VM Data disk. This time I run it with the other DiskName.  
Update-AzureDisk -DiskName ate-azr400-ate-azr400-1-201505171031360397 -Label ResizeDataDisk -ResizedSizeInGB 150

Resize Azure VM Data Disk


3. If I now retrieve the information again I'll find that the disk size has been updated to 150 GB. 

Resized to 150 GB.

4. Power On the VM again and review the changes. You should find that the disk has now changed to 150 GB.

Disk size increased to 150 GB

Sunday, August 2, 2015

Change Windows 2012 R2 Server Edition without Re Installing Windows from Media

Just started a new project today for a customer where I will be building a 2 node DAG on Server 2012.
Got the Exchange server bits installed and then tried creating the DAG which failed.
After a bit of analysis it transpires that the customer built the base OS with Windows 2012 Standard and not DataCenter (Server 2012 doesn’t include an Enterprise Edition any more)
Luckily we can convert between editions of Windows Server on the fly via DISM (Deployment Image Service & Management)
TechNet documentation on converting between server 2012 versions can be found here
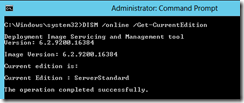
To determine the current edition of Windows Server installed run the following
  • DISM /online /Get-CurrentEdition
image
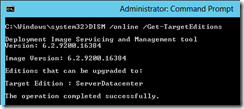
To determine which versions the server can be upgraded to run
  • DISM /online /Get-TargetEditions
image
As can be seen from the above screenshot this version of Windows Server can be upgraded toTarget Edition : ServerDatacenter
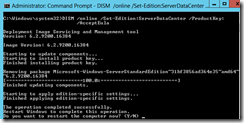
To complete the conversion between editions we use the DISM command with the following format
  • DISM /online /Set-Edition:<Version> /ProductKey:XXXXX-XXXXX-XXXXX-XXXXX-XXXXX /AcceptEULA
In the above example the target edition is ServerDatacenter
image
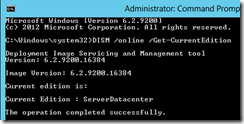
A reboot of the server and a check of the server edition reveals that is has indeed been successfully upgraded to DataCenter
image

Wednesday, July 22, 2015

To upgrade from the evaluation version of Operations Manager to a licensed version

To upgrade from the evaluation version of Operations Manager to a licensed version

  1. On a management server, click Start, click All Programs, click Microsoft System Center 2012, click Operations Manager, and then click Operations Manager Command Shell.
  2. In the Operations Manager Command Shell, type the following command:
    Set-SCOMLicense <license_key>
  3. Restart the System Center Data Access Service. You can use the Microsoft Management Console to restart services.
  4. Restart the System Center Data Access Service on all management servers in the management group.
For more information about Set-SCOMLicense, type the following in the Operations Manager Command Shell:
get-help Set-SCOMLicense
For current information about your license, you can use the Get-SCOMLicense cmdlet. For more information, type the following in the Operations Manager Command Shell:
get-help Get-SCOMLicense

Thanks,
Sam
3107348498

Sunday, January 11, 2015

Create and upload a Windows Server VHD to Azure

This article shows you how to upload a virtual hard disk (VHD) with an operating system so you can use it as an image to create virtual machines based on that image. For more information about disks and images in Microsoft Azure, see About Disks and Images in Azure.

Note: When you create a virtual machine, you can customize the operating system settings to facilitate running your application. The configuration that you set is stored on disk for that virtual machine. For instructions, see How to Create a Custom Virtual Machine.

Prerequisites

This article assumes that you have the following items:
An Azure subscription - If you don't have one, you can create a free trial account in just a couple of minutes. For details, see Create an Azure account.
Microsoft Azure PowerShell - You have the Microsoft Azure PowerShell module installed. To download the module, see Microsoft Azure Downloads. A tutorial to install and configure PowerShell with your Azure Subscription can be found here.
  • The Add-AzureVHD cmdlet, which is part of the Microsoft Azure PowerShell module. You'll use this cmdlet to upload the VHD.
A supported Windows operating system stored in a .vhd file - You have installed a supported Windows Server operating system to a virtual hard disk. Multiple tools exist to create .vhd files. You can use a virtualization solutions such as Hyper-V to create the .vhd file and install the operating system. For instructions, see Install the Hyper-V Role and Configure a Virtual Machine.
Important: The VHDX format is not supported in Microsoft Azure. You can convert the disk to VHD format using Hyper-V Manager or the Convert-VHD cmdlet. A tutorial on this can be found here.
Window Server operating system media. This task requires an .iso file that contains the Windows Server operating system. The following Windows Server versions are supported:
OSSKUSERVICE PACKARCHITECTURE
Windows Server 2012 R2All editionsN/Ax64
Windows Server 2012All editionsN/Ax64
Windows Server 2008 R2All editionsSP1x64
This task includes the following steps:

Step 1: Prepare the image to be uploaded

Before the image can be uploaded to Azure, it must be generalized by using the Sysprep command. For more information about using Sysprep, see How to Use Sysprep: An Introduction.
In the virtual machine that you just created, complete the following procedure:
  1. Log in to the operating system.
  2. Open a Command Prompt window as an administrator. Change the directory to %windir%\system32\sysprep, and then run sysprep.exe.
    Open Command Prompt window
  3. The System Preparation Tool dialog box appears.
    Start Sysprep
  4. In the System Preparation Tool, select Enter System Out of Box Experience (OOBE) and make sure that Generalize is checked.
  5. In Shutdown Options, select Shutdown.
  6. Click OK.

Step 2: Create a storage account in Azure

A storage account represents the highest level of the namespace for accessing the storage services and is associated with your Azure subscription. You need a storage account in Azure to upload a .vhd file to Azure that can be used for creating a virtual machine. You can use the Azure Management Portal to create a storage account.
  1. Sign in to the Azure Management Portal.
  2. On the command bar, click New.
  3. Click Storage Account, and then click Quick Create.
    Quick create a storage account
  4. Fill out the fields as follows:
  5. Under URL, type a subdomain name to use in the URL for the storage account. The entry can contain from 3-24 lowercase letters and numbers. This name becomes the host name within the URL that is used to address Blob, Queue, or Table resources for the subscription.
  6. Choose the location or affinity group for the storage account. By specifying an affinity group, you can co-locate your cloud services in the same data center with your storage.
  7. Decide whether to use geo-replication for the storage account. Geo-replication is turned on by default. This option replicates your data to a secondary location, at no cost to you, so that your storage fails over to a secondary location if a major failure occurs that can't be handled in the primary location. The secondary location is assigned automatically, and can't be changed. If legal requirements or organizational policy requires tighter control over the location of your cloud-based storage, you can turn off geo-replication. However, be aware that if you later turn on geo-replication, you will be charged a one-time data transfer fee to replicate your existing data to the secondary location. Storage services without geo-replication are offered at a discount. More details on managing geo-replication of Storage accounts can be found here: Create, manage, or delete a storage account.
    Enter storage account details
  8. Click Create Storage Account.
    The account now appears under Storage Accounts.
    Storage account successfully created
  9. Next, create a container for your uploaded VHDs. Click on the Storage account name and then click on Containers.
    Storage account detail
  10. Click Create a Container.
    Storage account detail
  11. Type a Name for your container and select the Access Policy.
    Container name

Step 3: Prepare the connection to Microsoft Azure

Before you can upload a .vhd file, you need to establish a secure connection between your computer and your subscription in Microsoft Azure. You can use the Microsoft Azure Active Directory method or the certificate method to do this.

Use the Microsoft Azure AD method

  1. Open the Microsoft Azure PowerShell console, as instructed in How to: Install Microsoft Azure PowerShell.
  2. Type the following command:
    Add-AzureAccount
    This command opens a sign-in window so you can sign with your work or school account.
    PowerShell Window
  3. Microsoft Azure authenticates and saves the credential information, and then closes the window.

Use the certificate method

  1. Open a Microsoft Azure PowerShell window.
  2. Type: Get-AzurePublishSettingsFile.
  3. A browser window opens and prompts you to download a .publishsettings file. It contains information and a certificate for your Microsoft Azure subscription.
    Browser download page
  4. Save the .publishsettings file.
  5. Type: Import-AzurePublishSettingsFile <PathToFile>
    Where <PathToFile> is the full path to the .publishsettings file.
    For more information, see Get Started with Microsoft Azure Cmdlets
    For more information on installing and configuring PowerShell, see How to install and configure Microsoft Azure PowerShell

Step 4: Upload the .vhd file

When you upload the .vhd file, you can place the .vhd file anywhere within your blob storage. In the following command examples, BlobStorageURL is the URL for the storage account that you created in Step 2, YourImagesFolder is the container within blob storage where you want to store your images.VHDName is the label that appears in the Management Portal to identify the virtual hard disk. PathToVHDFile is the full path and name of the .vhd file.
  1. From the Microsoft Azure PowerShell window you used in the previous step, type:
    Add-AzureVhd -Destination "<BlobStorageURL>/<YourImagesFolder>/<VHDName>.vhd" -LocalFilePath <PathToVHDFile>
    PowerShell Add-AzureVHD
    For more information about the Add-AzureVhd cmdlet, see Add-AzureVhd.

Add the Image to Your List of Custom Images

After you upload the .vhd, you add it as an image to the list of custom images associated with your subscription.
  1. From the Management Portal, under All Items, click Virtual Machines.
  2. Under Virtual Machines, click Images.
  3. And then click Create an Image.
    PowerShell Add-AzureVHD
  4. In Create an image from a VHD, do the following:
    • Specify name
    • Specify description
    • To specify the URL of your VHD click the folder button to launch the below dialog box
    Select VHD- Select the storage account your VHD is in and click Open. This returns you to the Create an image from a VHD window. - After you return to theCreate an image from a VHD window, select the Operating System Family. - Check I have run Sysprep on the virtual machine associated with this VHD to acknowledge that you generalized the operating system in Step 1, and then click OK.
    Add Image
  5. OPTIONAL : You can also use Azure PowerShell's Add-AzureVMImage cmdlet to add your VHD as an image.
    From the Microsoft Azure PowerShell window, type:
    Add-AzureVMImage -ImageName <Your Image's Name> -MediaLocation <location of the VHD> -OS <Type of the OS on the VHD>
    PowerShell Add-AzureVMImage
  6. After you complete the previous steps, the new image is listed when you choose the Images tab.
    custom image
    When you create a new virtual machine, you can now use this new image. Choose My Images to show the new image. For instructions, see Create a Virtual Machine Running Windows Server.
    create VM from custom image

Modernizing Legacy Clients: Why Now Is the Time to Secure and Transform

Hey folks! 👋 Had a random hour of “should I scroll or build?” — so here I am, blogging instead of doomscrolling. 😅 If you're still l...