Monday, December 21, 2015

DPM agent install and Windows 2008 server Harding

When the server you try to install the DPM 2007 agent on is locked down by the Windows firewall, you could have a hard time installing the DPM agent on the server.


In most of the cases when you try to push the agent from the DPM administrative console you get an error message that the Windows Firewall on the target machine is blocking the installation.Disabling the firewall rules for all adapters can solve this issue. Run the following command on the Target machine before pushing the agent:
netsh firewall set opmode disable

When the Security configuration wizard is used, it can be a little trickier
My experience is that you get the following error during pushing the agent from the DPM console:
Install protection agent on xxx failed:
Error 313: The agent operation failed because an error occurred while running the installation program on xxx.
Error details: Fatal error during installation (0x80070643)
Recommended action: Review the log files on xxx: [windir]\temp\msdpm*.log and take appropriate action. Retry the operation, and if the error persists, restart the computer and then retry the operation again.


But also local install will falll with this error:Installing agent and configure for dpmserver =[xxx]
DPMAgentInstaller failed with errorcode =80070643, error says: Fatal error during installation.
Check log files in [WINDIR]Temp\MSDPM*.LOG
Press Enter key to close the window

Manual set DPM server wil also fail with error:
SetDpmServer failed with errorcode =80004005, error says: Unspecified error
The reason is that during the DPM agent installation some exceptions need to be made to the Windows firewall and with the Windows Security configuration Wizard.

The following workaround can be used:
  1. Logon to the target machine (from console – remote management card etc)
  2. Copy the installation files to a local temp directory
  3. Net stop mpssvc (will stop windows firewall services\will stop network connections)
  4. run the installation (for x64): DPMAgentInstaller_KB959605_AMD64.exe dpmservername.fqdn
  5. Reboot the target server
  6. Make a firewall rule that allows the application DPMRA to communicate(all profiles)
  7. On the DPM server, from the DPM Management Shell prompt, type Attach-ProductionServer.ps1 .

How to set the default attachment folder in Outlook

To Modify the Registry Setting

  1. Click Start, and click Run.
  2. In the Open box, type regedit, and then click OK.
  3. Locate the following registry key:
    HKEY_CURRENT_USER\Software\Microsoft\Windows\CurrentVersion\Explorer\User Shell Folders
  4. Double-click Personal in the right pane.
  5. Change the value to the path you want. For example:
    C:\My Attachments, would set the location to the My Attachments folder. 
    %USERPROFILE%\My Documents, would set it to the My Documents folder on a computer that had more than one user profile. 
  6. On the Registry menu, click Exit.
  7. Restart Outlook.
When you open a new mail message and attach a file, the Insert File dialog box opens to the folder you have specified.

Wednesday, December 16, 2015

Rollback from Windows 10 to your previous version of Windows

Not liking the newly installed version of Windows 10? Has it messed up your PC settings? Are you feeling troubled with its all new interface and program settings? Don’t worry, Microsoft allows you to roll back to your previous Windows right away. That is – if you carried out an in-place upgrade of your Windows 8.1 or Windows 7 operating system. This tutorial will show you how to rollback Windows 10 to your previous version of Windows, provided you performed in-place upgrade  from Windows 8.1 or Windows 7 to Windows 10 – and provided you carry put the rollback operationwithin 30 days of upgrading to Windows 10.

Rollback from Windows 10

Windows 10 has some great new features like Edge Browser, Windows Hello, Virtual Desktop,Device Guard, Antimalware Scan Interface, etc. but some people just can’t get past the habit and comfort of using their previous Windows versions. And then again, some may have messed up their upgrade and may want to get back to the stability of their previous Windows version, after using Windows 10 for a few days.
Thankfully Microsoft has kept an option of rollback, where unsatisfied users can uninstall the upgrade and rollback to the previous version of Windows – Windows 8.1 or Windows 7.
To roll back your Windows 10, go to your PC Settings, by typing Settings in the taskbar search bar, next to the Windows icon, and clicking on Settings. It will open the PC Settings. Select ‘Update and Security’.
Rollback from Windows 10
The Update and Security option opens. Here you will see options like Windows Update, Activation, Backup, Recovery and Windows Defender. Click on ‘Recovery‘.
rollback to Win 10 c

This will open the Recovery settings window for your PC. You will see 3 options:
  1. Reset this PC: Remove everything and reinstall Windows. This will take your PC to its original factory settings.
  2. Go back to your previous version of Windows: This will just bring your previous Windows back on your PC without affecting your documents and files. Note that you have to carry out the rollback operation, within 30 days of upgrading to Windows 10
  3. Advanced Startup: Here you can change your PC settings using a Windows image or a USB/DVD.
rollback to Win 10 d
Click on ‘Go back to previous version of Windows’. In this case you see Go back to Windows 8.1.
Microsoft will then ask for your feedback and the reason to uninstall Windows 10.
Rollback to Windows 10 ab
Give your feedback and move ahead. Click on Next. You will see the following screen.
rollback to win 10 e
Make sure your PC is plugged in as the rollback might get interrupted due to power off. Click on the Go back to Windows 8.1 button.
gYour system might take a while to process the roll back and read the settings of your previous Windows version. Sit back and enjoy a cup of coffee. Note the important warning – you need to know or remember your password you used to sign on into your previous Windows version.rollback to Win 10 f
Once the rollback process is completed, your PC will automatically be booted into your previous version of Windows.
Rollback is dependent on the availability of the Windows.old & other folders folder, if you delete that, then you may not be offered the option to rollback.

Monday, November 23, 2015

Trouble shooting Set-SCOMLicense

I’ve seen this in the forums a bit much to not blog about this topic. One of the more important things to do when deploying System Center Operations Manager 2012 is to set the license key. By default Operations Manager installs itself in 180 day evaluation mode. You can identify weather Operations Manager is in Evaluation mode by opening up the Operations console, and click help about. An Evaluation is shown below.
_EVALMODE

Normal usage of Set-SCOMLicense
1. Log in Management Server
2. Open Operation Manager Shell
3. type :Set-SCOMLicense -ProductId yourlicensekey _posheasylicense
Well this did not work as I had hoped it would. Looks like some kind of registry permissions problem. Typical.
Start Powershell using run as Administrator
1. Type: Import-module OperationsManager
2. Type: Set-SCOMLicense -ProductId yourlicensekey

_SCOMLICENSE_2
After running this cmdlet you will not get any confirmation that anything has changed. The best way to verify that it has been updated is to restart the Operations Manager server, then open up the console and selecting help about.
_RETAIL

Monday, October 19, 2015

Send Out of Office notices with POP3, IMAP, and Outlook.com accounts


NOTE    If you use a Microsoft Exchange Server account in Microsoft Outlook 2010, use the Automatic Replies feature. See Automatically reply to messages (formerly the Out of Office Assistant). This article is for all other email account types, such as Outlook.com (formerly Hotmail), POP3, and IMAP.
How can I tell if I am using a Microsoft Exchange Server account?
Click the File tab. Click Account Settings, and then click Account Settings. On the E-mail tab, the list of accounts indicates the type of each account. If Microsoft Exchange doesn’t appear, you are not using an Exchange Server account.

You can set up Outlook 2010 to send an automatic response to some or all of the people who send you email messages.
You can combine an Outlook email template with Outlook rules to reproduce the functionality of the Automatic Replies feature that is available only to Exchange Server accounts.
IMPORTANT    This functionality is available in Outlook 2010 beginning with Microsoft Office 2010 Service Pack 1.
Step 1: Create a message template
  1. On the Home tab, in the New group, click New E-mail.
  2. In the message body, type the message that you want to send as your automated reply.
  3. In the message window, click the File tab, and then click Save As.
  4. In the Save As dialog box, in the Save as type list, click Outlook Template (*.oft).
  5. In the File name box, type a name for your message template, and then click Save.
Top of Page
Step 2: Create a rule to automatically reply to new email messages
Do one of the following:

  1. On the Home tab, in the Move group, click Rules, and then click Manage Rules & Alerts.
  2. In the Rules and Alerts dialog box, click New Rule.
  3. Under Start from a blank rule, click Apply rules on messages I receive, and then click Next.
  4. Under Which condition(s) do you want to check?, select any criteria that you want, and then click Next. Typically, you don’t need to select any items.
  5. Under What do you want to do with the message?, select the reply using a specific template check box.
  6. Under Step 2: Edit the rule description (click an underlined value), click a specific template.
  7. In the Select a Reply Template dialog box, in the Look In box, click User Templates in File System.
  8. Select the template that you created in the previous section or one that you have created or downloaded, and then click Open.
  9. Click Next.
  10. Select the check boxes for any exceptions to the auto-reply rule. It is common not to add any exceptions.
  11. Click Next.
  12. Under Step 1: Specify a name for this rule, type a name for the auto-reply rule, and then click Finish.
Turn off automatic replies
To turn off a rule that is sending automatic replies, do the following:
  1. On the Home tab, in the Move group, click Rules, and then click Manage Rules & Alerts.
  2. On the E-mail Rules tab, under Rule, clear the check box for the rule that you want to turn off.

Tuesday, September 15, 2015

Attempts to schedule a mailed report in DPM 2012 R2 fail with “Reporting Services Server cannot connect to the DPM database”

Figure 1 below shows this error.
clip_image002
Figure 1.
Following the repair steps suggested in the More Information link does not resolve the problem.
To resolve this error, please use the steps below to make proper configuration changes which will then allow DPM reports to be e-mailed.
NOTE: Some steps may not be necessary if you encounter the problem after an upgrade from DPM 2012 SP1. Review and perform the steps as applicable.
1. On the DPM 2012 R2 server, create a new local group called "DPMDBReaders$<DPMServerName>" In my example the DPMServername is WINB-DPM.
clip_image004
Figure 2.
2. Create a new local user called "DPMR$<DPMServerName> and provide a strong password that never expires. See figure 3 below.
clip_image006
Figure 3.
3. Add the newly created user to the DPMDBReaders$DPMservername group that was created in step 1 above. See figure 4.
clip_image008
Figure 4.
4. Start SQL Management Studio using administrative privileges and connect to the SQL instance used by DPM. UnderSecurity, right-click on the Logins and select New login… then browse to add the local group DPMDBReaders$<DPMServerName >. Once the group is added it will be listed as seen in figure 5.
clip_image010
Figure 5.
5. Right-click the group and select Properties. Under the General section, change the default database to the DPMDB name. See figure 6.
clip_image012
Figure 6.
6. Under the User Mapping section, select the checkbox for the DPMDB name and the checkbox for the db_datareader role. See figure 7.
clip_image014
Figure 7.
7. In SQL Management Studio, navigate to the Databases > DPMDB > Security > Users > and select the DPMDBReaders$<DPMServerName>" group. See figure 8.
clip_image016
Figure 8.
8. Right-click the DPMDBReaders$<DPMServerName>" group and select Properties. Under the Securables section, click onSearch. On the add objects dialog, click OK. On the Select Objects dialog, click the Objects type, then check the stored procedure checkbox. Browse and add the following two stored procedures:
Prc_MOM_Heartbeat_Get
prc_MOM_ProductionServer_Get
Grant the Execute permission for both of the stored procedures added. See figure 9.
clip_image018
Figure 9.
9. Exit SQL Management Studio.
10. Start Reporting Services Configuration Manager and click on the Report Manager URL. See figure 10.  
clip_image020
Figure 10.
11. Click on the URLs: link. This will open the http://localhost/Reports/Pages/Folder.aspx) portal as seen in Figure 11.
clip_image022
Figure 11.
12. Click on the DPMReports_GUID link to open the DPM reports page as seen in Figure 12.
clip_image024
Figure 12.
13. Click on the DPMReporterDataSource to open its properties as seen in figure 13.
clip_image026
Figure 13.
14. On the DPMReporterDataSource configuration page, perform the following steps:
i. Enable the option: "Credentials stored securely in the report server"
ii. Add the “DPMR$<DPMServerName>” user Account and Password created in step 2.
iii. Check the checkbox to "Use as Windows credentials when connecting to the data source."
iv. Click ‘Test connection’ on to verify whether it can connect successfully.
v. Click the Apply.
15. Close the DPMReporterDataSource configuration page to return to the Reporting Services Configuration Manager screen. Click on the Service Account. On this page change Report Server Service Account service to use Network Service. If you are prompted for the Backup Encryption Key, fill on the parameters and continue. See Figure 14 below.
clip_image028
Figure 14.
16. Reboot the DPM Server to ensure all configuration changes take effect.
17. You should now be able to schedule e-mail reports without experiencing the original error.
clip_image030

Sunday, August 16, 2015

Resize Azure VM OS or Data Disk

Resizing an Azure VM disk using Update-AzureDisk -ResizedSizeinGB

Resizing an Azure VM disk was only possible until recently by using third party software such as Cloud Xplorer using a multistep approach. Not ideal. Best practice says provision Azure disk at maximum capacity but for one of my customers I faced the challenge where I migrated VMs using Azure Site Recovery. ASR is a great tool but it provisioned the target VMs with disks that match the size of the source, and it doesn't provide the option to change this. Now what if I run out of space? Or what if I don't want a 30 GB OS volume, but the 127 GB default size.

To overcome this problem I searched and found the following article. Azure Linux VM - Resize root volume. Great article, but it's only covers OS disks and Linux. The article includes a new command which hasn't been documented on MSDN yet. Which is Update-AzureDisk -ResizedSizeinGB

In my case I'm dealing with Azure VMs that run the Windows OS, and in many cases it's not only the OS disk that needs to be resized, but also the data disk.

I tested both scenario's and can confirm the Update-AzureDisk -ResizedSizeinGB works on both OS and data disks. In this article I'll explain how to use the command to resize Azure VM disks.

Note: The disk cannot be in use, shutdown the VM prior to making this change. And it cannot be reversed. You can only increase the size, the command will not allow you to shrink. 

The command

The command is pretty straight forward and all you need is to be a co-administrator and running the latest AzurePowerShell cmdlet. The command itself is as follow. 

Update-AzureDisk -DiskName 'MyDiskName' -Label 'MyLabel' -ResizedSizeInGB 300

Changing the disk size Step-by-Step


The Azure VM OS disk resize

1. First of all we'll connect to the subject VM and check out it's OS disk size. In this case it's a standard Azure VM with a 127GB disk. It can of course also be a much smaller disk which is in desperate need of resizing.

Azure VM OS Disk - 127 GB


2. De-allocate the Azure VM. The disks cannot be in use at the time of the resize.

3. Connect to your subscription using the latest Azure PowerShell cmdlet. 

4. To resize the disk you'll require the Diskname. To retrieve this information, in my case of VM ate-azr400, run the following command. If you want to make your life easy, store this information in a variable.
Get-AzureVM -ServiceName ate-azr4 -Name Ate-azr400 | Get-AzureOSDisk


Retrieve Azure VM DiskName


5. Run the following command to resize the disk. This will take a few second so be patient while the resize takes place.
Update-AzureDisk -DiskName ate-azr400-ate-azr400-0-201502180257360595 -Label Resized -ResizedSizeInGB 300


Update-AzureDisk -ResizedSizeinGB


6. Now have a look in the portal and browse to the container where the OS disk is stored. You'll find that the VHD has increased from the former 127 GB to 300 GB.

New size in Portal


7. Power On the Azure VM, and open the disk management to view the changes that have been applied. If you require the space extend your volume.

Resized VM OS Disk - 300 GB


The Azure VM Data Disk Resize

To resize the Azure VM Data Disk you pretty much follow the same process. The only difference is the command used to retrieve the Azure Disk Name.

1. To resize Azure Data Disk you'll require the Diskname. Note that this time I run Get-AzureDataDisk. In this case I want to extend the 10 GB disks.
Get-AzureVM -ServiceName ate-azr4 -Name Ate-azr400 | Get-AzureDataDisk


Get-AzureDataDisk


2. Next I run the same Update-AzureDisk -ResizedsizeinGB cmdlet to resize the Azure VM Data disk. This time I run it with the other DiskName.  
Update-AzureDisk -DiskName ate-azr400-ate-azr400-1-201505171031360397 -Label ResizeDataDisk -ResizedSizeInGB 150

Resize Azure VM Data Disk


3. If I now retrieve the information again I'll find that the disk size has been updated to 150 GB. 

Resized to 150 GB.

4. Power On the VM again and review the changes. You should find that the disk has now changed to 150 GB.

Disk size increased to 150 GB

Sunday, August 2, 2015

Change Windows 2012 R2 Server Edition without Re Installing Windows from Media

Just started a new project today for a customer where I will be building a 2 node DAG on Server 2012.
Got the Exchange server bits installed and then tried creating the DAG which failed.
After a bit of analysis it transpires that the customer built the base OS with Windows 2012 Standard and not DataCenter (Server 2012 doesn’t include an Enterprise Edition any more)
Luckily we can convert between editions of Windows Server on the fly via DISM (Deployment Image Service & Management)
TechNet documentation on converting between server 2012 versions can be found here
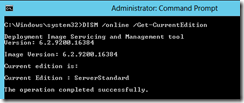
To determine the current edition of Windows Server installed run the following
  • DISM /online /Get-CurrentEdition
image
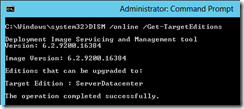
To determine which versions the server can be upgraded to run
  • DISM /online /Get-TargetEditions
image
As can be seen from the above screenshot this version of Windows Server can be upgraded toTarget Edition : ServerDatacenter
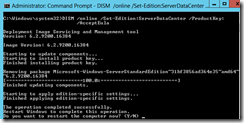
To complete the conversion between editions we use the DISM command with the following format
  • DISM /online /Set-Edition:<Version> /ProductKey:XXXXX-XXXXX-XXXXX-XXXXX-XXXXX /AcceptEULA
In the above example the target edition is ServerDatacenter
image
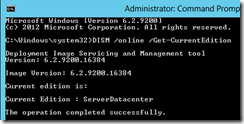
A reboot of the server and a check of the server edition reveals that is has indeed been successfully upgraded to DataCenter
image

Thursday, July 30, 2015

Step-By-Step: Migration of DHCP from Windows Server 2003 to Windows Server 2012

Migration from Windows Server 2003 to 2012 has been deemed troublesome by few as the netsh DHCP command-line was replaced in Windows Server 2012 by PowerShell. The process however is actually quite easy and can be completed in a few steps.

Prerequisite

Download Windows Server 2012
If you plan on completing this Step-By-Step in a virtual lab, it is recommended to download the FREE Hyper-V Server 2012 first.

Beginning the export process on Windows Server 2003
  1. On the Windows 2003 DHCP server, navigate to a command prompt
  2. Type the following Command: netsh
  3. Type the following Command: DHCP
  4. Type the following Command: server \\Name or IP Address
  5. Type the following Command: export c:\w2k3DHCPdb all

    Note You must have local administrator permissions to export the data.

Importing the DHCP database on Windows Server 2012
  1. Copy the exported DHCP database file to the local hard disk of the Windows Server 2008-based computer. 
  2. From within Server Manager, select Add roles and features

  3. Select Role-based of featured-based installation and select Next.
  4. On the Server Selection window, leave the default and select Next. When the Server Roles window opens, select DHCP. Select Add Features in the pop-up window, then select Next.

  5. Once the DHCP install has been completed, select DHCP located in the Server Manager dashboard
  6. Right click the designated DHCP server in the services pane, then select Stop.
  7. Delete the DHCP.mdb file under c:\windows\system32\DHCP folder.
  8. Return to DHCP located in the Server Manager dashboard
  9. Right click the designated DHCP server in the services pane, then select Start.
  10. Right-click on the bottom left hand side of the desktop screen to invoke the admin menu

  11. Select Command Prompt (Admin) to open the cmd prompt using elevated privileges. 
  12. Type the following Command: netsh
  13. Type the following Command: DHCP
  14. Type the following Command: server \\Name or IP Address
  15. Type the following Command: import c:\w2k3DHCPdb
  16. Close the command prompt when completed.
  17. Return to DHCP located in the Server Manager dashboard.
  18. Right click the designated DHCP server in the services pane, then select Restart.
  19. Disable and remove DHCP from the Windows 2003 server.
Simply setup your scope options for your new Windows Server 2012 DHCP server and then Authorize it within your domain and the  migration is complete.

Step-By-Step: Active Directory Migration from Windows Server 2003 to Windows Server 2012 R2

With the end of support for Windows XP, Office 2003 and Exchange 2003 now upon us, April 8th 2014 to be exact, attention now turns to Windows Server or specifically Windows Server 2003.  End of support for Windows Server 2003 is currently slated for July 14th 2015 and a great many organizations still utilize said offering as the cornerstone to their infrastructure to this day.  One question to keep in mind though is that with the move on the client end to Windows 8.1, will Windows Server 2003 or 2003 R2 be robust enough to properly enable employees and provide secure access to the plethora of devices in a world now dominated by BYOD?  Alternatively an IT administrator might ponder on the further enablement invoked via the deployment of Windows Server 2012 R2 should it be deployed in said organization.  Lets explore this possibility via the cornerstone of access enablement offered via Windows Server by investigating the evolution of the Active Directory offering now found in Windows Server 2012 R2
As you may know, Active Directory provides authentication and authorization mechanisms as well as framework from within other related services that can be deployed. As an LDAP compliant database, it commonly contains the most used objects such as users, computers, and groups organized into organizational units or OUs by any number of logical or business needs. Group Policy Objects or GPOs are then linked to OUs to centralize the settings for various users or computers across an organization. Part of the quandaries that IT professionals face is taking advantage of nuances provided in Active Directory in newer server offerings such as Windows Server 2012.  As detailed in Pierre's post, "Windows Server 2012 Active Directory – What’s New?", Active Directory provided in Windows Server 2012 R2 is provided impactful enhancements.  Yet some organizations choose not to migrate due to reasons of uncertainty.
This Step-By-Step has been created to assist with that uncertainty and provide guidance for IT professionals looking to migrate their organizations Active Directory offering from Windows Server 2003 to 2012 R2.

Prerequisites
  1. Download Windows Server 2012 R2 and create your lab environment. (Instructions can be found here)
  2. Complete Step-By-Step: Adding a Windows Server 2012 R2 Domain Controller to an Existing Windows Server 2003 network

Transferring the Flexible Single Master Operations (FSMO) Role
  1. Open the Active Directory Users and Computers console on your new Windows Server 2012 R2 computer.
  2. Right click your domain and select Operations Masters in the sub menu.
  3. In the Operations Masters window, ensure the RID tab is selected.
  4. Select the Change button.

  5. Select Yes when asked about transferring the operations master role.
  6. Once the operations master role has successfully transferred, click OK to continue.
  7. Ensure the Operations Master box now shows your new 2012 R2 Windows Server.
  8. Repeat steps 4 to 6 for the PDC and Infrastructure tabs.
  9. Once completed, click Close to close the Operations Masters window.
  10. Close the Active Directory Users and Computers window.

Changing the Active Directory Domain Controller 
  1. Open the Active Directory Domains and Trusts console on your new Windows Server 2012 R2 computer.
  2. Right click your domain and select Change Active Directory Domain Controller... in the sub menu.
  3. In the Change Directory Server window, select This Domain Controller or AD LDS instance.
  4. Select your new 2012 R2 Windows Server.

  5. Click OK to continue.
  6. Back in the Active Directory Domains and Trusts window, hover over the Active Directory Domains and Trusts found in the folder tree on the left hand side to ensure the server now reflects your new 2012 R2 Windows server.
  7. Right click Active Directory Domains and Trusts found in the folder tree and select Operations Manager... in the sub menu.
  8. In the Operations Master window, click Change to transfer the domain naming master role to the 2012 R2 Windows Server.
  9. When asked if you are sure you wish to transfer the operations master role to a different computer, clickYes.
  10. Once the operations master is successfully transferred, click OK to continue.
  11. Click Close to close the Operations Master window.
  12. Close the Active Directory Domains and Trusts console.

Changing the Schema Master
  1. Open a command prompt in administration view on your new Windows Server 2012 R2 computer.
  2. On the command prompt window, enter regsvr32 schmmgmt.dll and hit enter.
  3. Once completed successfully, click OK to close the RegSvr32 window.

  4. Close the command prompt.

Add the Active Directory Schema Console from MMC
  1. Open a MMC console on your new Windows Server 2012 R2 computer.
  2. Click File > Add/Remove Snap-in...
  3. In the Add or Remove Snap-ins window, select Active Directory Schema and click the Add >button.

  4. Click OK to continue.

Change the Schema Master
  1. In the same MMC console, right click Active Directory Schema and select Change Active Directory Domain Controller... in the sub menu.
  2. In the Change Directory Server window, select This Domain Controller or AD LDS instance.
  3. Select your new 2012 R2 Windows Server.
  4. Click OK to continue.
  5. A warning will appear stating that the Active Directory Schema snap-in in not connected. Click OK to continue.
  6. Hover over the Active Directory Schema folder in the folder tree to ensure the new Windows Server 2012 R2 computer is shown. 
  7. Now right click Active Directory Schema and select Operations Master... in the sub menu.
  8. In the Change Schema Master window, click Change to transfer the schema master role to the 2012 R2 Windows Server. 
  9. When asked if you are sure you wish to transfer the schema master role to a different computer, click Yes.
  10. Once the schema master is successfully transferred, click OK to continue.
  11. Click Close to close the Change Schema Master window.
  12. In the MMC, click File > Exit.
  13. When asked to save the console, click No.
 Once completed, open the Active Directory Users and Computers console to verify that the Active Directory database successfully replicated to your new Windows Server 2012 R2 computer.  Be aware that the database replication may take some time depending on the number of objects in Active Directory.

Removing the 2003 Windows Server from the Global Catalog Server
  1. Open Active Directory Sites and Services on your new Windows Server 2012 R2 computer.
  2. Expand the Sites folder, then the Default-First-Site-Name folder, then the Servers folder.
  3. Expand both listed servers. One should be your new 2012 Windows Server and one should be you 2003 Windows Server.
  4. Right click NTDS Settings found under your old 2003 Windows Server.
  5. In the sub menu, select Properties.
  6. Under the General Tabunselect Global Catalog and then click the Apply button.
  7. Click OK to continue.
  8. Close the Active Directory Sites and Services window.
  9. Verify that your new 2012 R2 Windows Server is running the FSMO role by opening the command prompt in Administrative view and running the following command: Netdom query fsmo.
  10. In the Network and Sharing Center, be sure to change the Preferred DNS server to match the Alternate DNS server, then delete the IP address listed under the Alternate DNS server should it currently be pointed to the old 2003 Windows Server.

All that's left is to demote the old 2003 Windows server by first adding the new 2012 R2 Windows Server as the Primary DNS, followed by running DCPROMO to demote the old 2003 Windows server. Be sure to also visit Microsoft Virtual Academy created to further enable IT professionals in regards task such as migrating to Windows Server 2012 R2.